
Build Your Own Recording Studio For Quality Music
 Constructing your personal recording studio is a challenge and will require some dedication on your part. It’s likely you are not about to complete everything in a day. Do not get disheartened or lose inspiration as you proceed with each step. You can get help if you want. Find a trade offers professional builders that you can contact and hire.
Keep in mind, when you are done, you will have your very own recording studio that you could use whenever you want. You will have the ability to play and record your songs without needing to spend for a recording studio.
There’s no need to worry if you lack funds as you can always get a small loan to start a small studio at home.
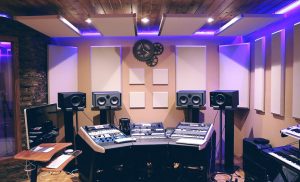
PICK THE BEST LOCATION IN YOUR HOME
There is absolutely no perfect size for recording studio built at home. But here are some considerations when choosing the right spot in the house. More space is better. Think about your instruments and other stuff that you will need for your recording. A quieter area is better. Interior rooms are better than exterior rooms. The higher the ceiling, the better but not really necessary.
SEAL LEAKY GAPS AND CRACKS
You have to ensure that your studio room is as securely plugged and packed as you can. If you would not wish to have a completely new entrance set up, you may seal open space using inexpensive sealing tape. Sealing tapes are made of materials such as rubber, foam, and vinyl which you can purchase at any hardware store. You can even get them from online stores.
ADD VENTILATION
You have to add some kind of ventilation to allow enough air to flow in. Install the most basic ventilation – the acoustic box. Make a box from Medium Density Fibreboard which can be bought in sheets. It has varying size and thickness. Purchase them online or from Home Depot. Use an S-shaped duct (this will allow air to flow into the studio) to insert to the box. Use acoustic foam to pad the rest of the parts.
RAISE THE FLOORS
The primary goal associated with raising the floors would be to make sure that loud, annoying oscillations will not hinder the wholesomeness of your recording. To make raised floors using the most simple method, you can just lay wood around foam pads. Be sure the wood is safely and securely resting on the foam blocks in order to avoid lack of stability.
Other steps you will need to take from this point is listed below:
• Diffuse the sound or soften the sound quality of your recording.
• Choose the right recording software.
• Set up an audio interface.
• Purchase the right equipment.
You can read more about the succeeding steps from Planetary Group.
